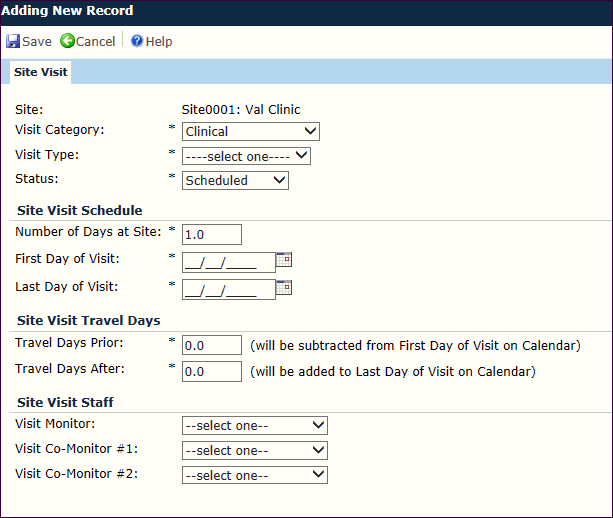
The Site Visit module allows the user the ability to add a single Site Visit record, indicate specifics about the visit, such as the type of Visit Category (Clinical, Audit, etc.) and the Visit Type (Pre-study, Interim, etc.), and determine if this site visit report will be a Manual or Integrated Report (see instructions below).
When adding a site visit and clicking save, you can enter additional information on the Attendees, Site Visit Report, Custom Fields (if defined), and Attachments tabs. Clicking save again, you will be returned to the Site Visits page and the site visit will appear on the Contact Calendar.
Click Common Buttons for a description of the buttons found throughout the system and their uses.
Adding a Site Visit

Editing a Site Visit
The Site Visit Dialog will be read-only when editing an existing record unless the current user is one of the Visit Monitors, Reviewers, Approvers, Site Visit Report Author, or has Admin Permission for the Site Visit Reports feature.

If users are instructed to use the Manual Report method, they should:
On the Attachments tab, upload a copy of the site visit report document
If users are instructed to use the Integrated Report method, they should:
In the Template field, either keep Auto-Assign Template or select the appropriate Template for the Visit Type
The next step is to complete the integrated Site Visit Report. See the Help instructions at Overview (Report Tool).
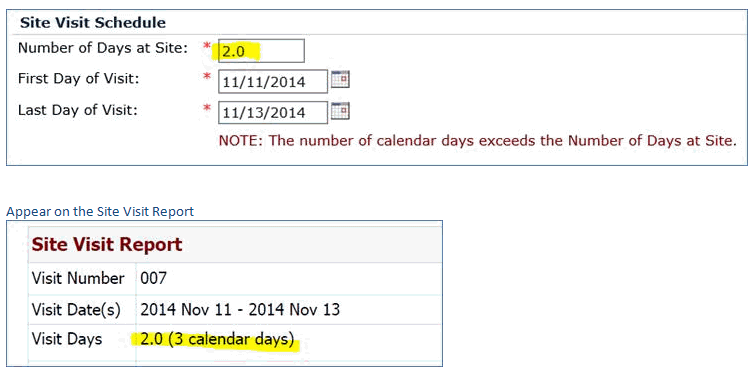
As an example of indicating a site visit that runs for non-consecutive days:

Field |
Description |
Site |
The user selects from a list of active sites. The field is required. It is read only when editing an existing record and adding a new record from the Site Visits Page or the Site Visits Tab of the Site Home Page. |
Visit Category |
The user selects from the list of site visit categories defined in the System Tables page. The field is required. |
Visit Type |
The user selects from the list of site visit types based on the selected visit category as defined in the System Tables page. The field is required. |
Status |
This field is required and the user selects from the following choices:
|
Comment |
The user enters up to 200 characters. The field is visible when editing an existing record. |
Number of Days at Site |
This field will accept numbers between 0.5 and the value set in the Site Visit Maximum Days configuration variable within Site Visit configuration group. The field defaults to 1.0 when adding a new records. This field is required. |
First Day of Visit |
The user enters or selects the date of the visit; future dates are allowed. This field allows future dates. The field is required. |
Last Day of Visit |
This field is required and displays the last date of the visit. A message will appear if the number of calendar days between the First Day of Visit and Last Day of Visit does not equal the Number of Days at Site minus one. This field allows future dates unless the Status is completed. |
Travel Days Prior |
This field accepts numbers between 0.0 (default) and 9.9. This field is required. This field will be visible when the Enable Site Visit Travel Days Configuration Variable is set to True. |
Travel Days After |
This field accepts numbers between 0.0 (default) and 9.9. This field is required. This field will be visible when the Enable Site Visit Travel Days Configuration Variable is set to True. |
Visit Monitor |
The user selects from the list of Project Team Members for the current project having a project role specified in the Site Visit Monitor Roles Configuration Variable under the Site Visit configuration group. When adding a new Site Visit record, this field will default to the current user if they are listed as available choices in the list. |
Visit Co-Monitor #1 |
The user selects from the list of Project Team Members for the current project having a project role specified in the Site Visit Monitor Roles Configuration Variable under the Site Visit configuration group. |
Visit Co-Monitor #2 |
The user selects from the list of Project Team Members for the current project having a project role specified in the Site Visit Monitor Roles Configuration Variable under the Site Visit configuration group. |