-
-
-
-
Under the Administration tab, System Tables menu item, click
 next to Document Categories.
-
-
-
Multiple consent forms may be used when there are amendments to the protocol and you wish to track the subjects’ signatures. You may use the same form or another form. You also can allow a site to have a specialized form, perhaps one written in the local language. As a default, the system is set to accept one consent form per subject. This section describes how you can change the setting to allow multiple forms per subject.
If the change occurs mid-study, then the subject consent date that is entered on the Enrollment tab will reflect the earliest date of the subject's consent on the Subject Consents page.
There are several steps needed to allow the system to accept multiple consent forms per subject. You will need to have Document Categories and Document Types for three base tables Project, Site, and Subject and then, turn on the functionality in the System Administration module.
Setting the System to Accept Multiple Consents
System Tables
In this section, the Administrator will add Document Categories for the three base tables, Project, Site, and Subject.
Add Document Categories
Project Base Table
Document Types added at the Project level can be shared at the Site level.
Under the Administration tab, System Tables menu item, click  next to Document Categories.
Under Base Table, select Project.
Check the list of Document Categories to see if the Document Type Consent Forms would fall under one of these categories. If not, click the Add New button for the Document Category module to open.
Enter the name of the category, such as Informed Consents and click Save. The category will appear in the Document Categories list.
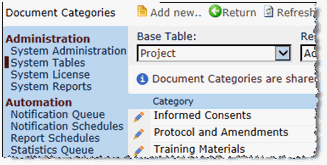
Site Base Table
If you have a site(s) that requires a different consent form from the Project consent form, for instance, if the form is written in the local language, then you can add a Document Category and Document Type for that site(s). As an example, you can add one Document Category that will be used for your site.
Under Base Table, select Site.
Check the list of Document Categories to see if the Document Type Consent Forms would fall under one of these categories. If not, click the Add New button for the Document Category module to open.
Enter the name of the category, such as Site Consents and click Save. The category will appear in the Document Categories list.

Subject Base Table
The Administrator will add one more Document Category, this time for the Subject base table.
Under Base Table, select Subject.
Check the list of Document Categories to see if the Document Type Consent Forms would fall under one of these categories. If not, click the Add New button for the Document Category module to open.
Enter the name of the category, such as Subject Consents and click Save. The category will appear in the Document Categories list.
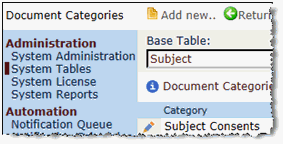
Add Document Types
Project Base Table
In this section, you will add as many different Project Document Types that you will need for each Informed Consent Template that will be used in your projects. These templates can be made available to all sites. For this demonstration, we will add two Project Document Types for two different Informed Consent Forms.
Under the Administration tab, System Tables menu item, click  next to Document Types.
Under Base Table, select Project.
Check the list of Document Types to see if the Document Type for consent forms is listed. If not, click for the Document Type module to open.
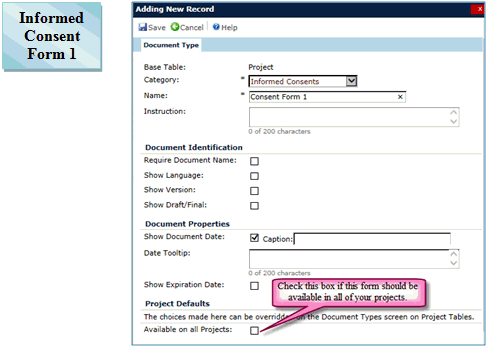
Select the Category entered in the previous section, Informed Consents.
Enter the name of the first consent form, such as Consent Form 1.
Placing a check in the Available on all Projects box will allow this form to appear in all of your projects without adding it under the Project tab, Project Tables menu item, Project Document Types. For the other fields in this module, see the Document Type section.
Click Save for additional tabs to appear.
Click the Document Tracking and Storage tab.
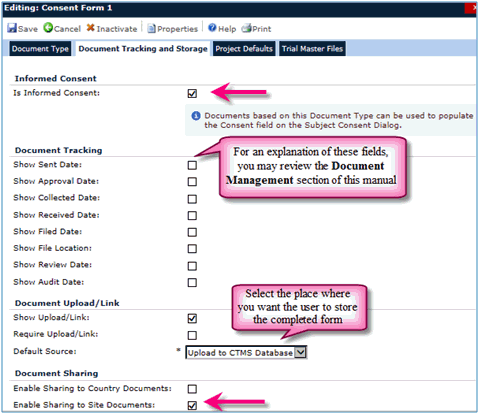
Place a check in the Is Informed Consent box, which indicates to the system that this is an informed consent document type.
If you are using ClinPlus CTMS to store documents, select a default source, such as Upload to CTMS Database, to save the user time in making the selection. Other options can be set, such as for SharePoint or pointing to your network..
Place a check in the Enable Sharing to Site Documents box, which will allow this form to appear on each site.
Click Save to return to the Document Types page.
Click the Add New button for the Document Type module to open and enter the same information for the second Informed Consent form.
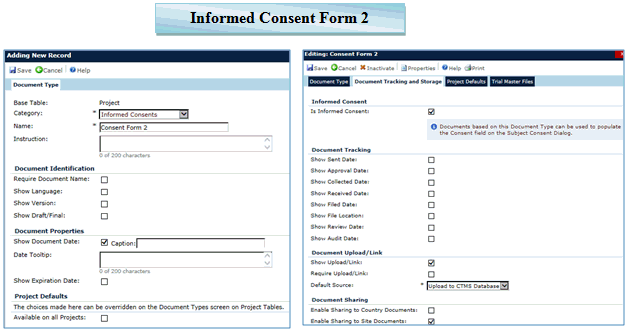
Click Save to return to the Document Types page.
Site Base Table
If you have a site(s) that requires a different consent form from the Project consent form, for instance, if the form is written in the local language, then you can add a Document Type for that site(s). In the above section, you may have added a Document Category for the Site base table. In this section, you will enter the Document Type.
Under the Administration tab, System Tables menu item, click  next to Document Types and under Base Table, select Site.
Check the list of Document Types to see if the Document Type for Site Consents is listed. If not, click for the Document Type module to open.
You may enter the following:
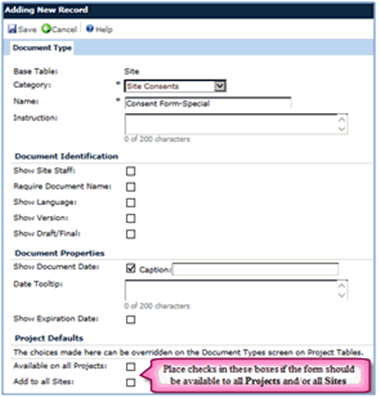
Click Save and enter the following on the Document Tracking and Storage tab. You may place checks in the other boxes if you wish to monitor those dates.
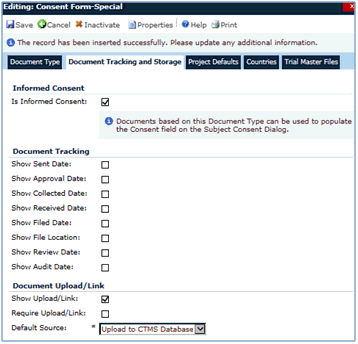
If this form should be made available to a specific country, then select the Countries tab and select the specific country. Click Save and select the country that your site is in.

Click and again to return to the Document Types page.
Subject Base Table
This step is necessary for the Multiple Informed Consent Form process. You will add one Document Type for the Subject base table.
Under the Administration tab, System Tables menu item, click  next to Document Types and under Base Table, select Subject.
Check the list of Document Types to see if the Document Type for Site Consents is listed. If not, click the Add New button for the Document Type module to open and enter the following:
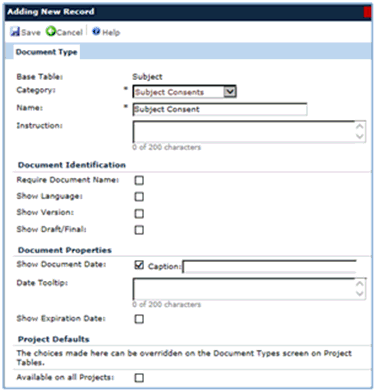
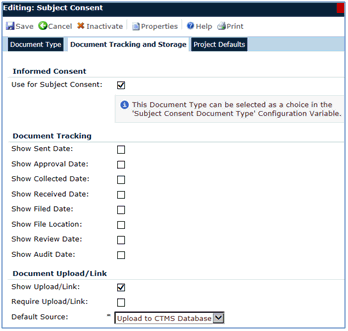
Click Save and click the Document Tracking and Storage tab. Simply check the Use for Subject Consent box and for the Default Source field, select Upload to CTMS Database.
Click to return to the Document Types page.
When changing from a single consent method to a multiple consent method, you must determine if this change is a System, Domain, or a Project level change. For this example, you will use Project level.
Under the Administration tab, System Administration menu item, click  next to Project Configuration.
Select the your project and the Subject Consent configuration group.
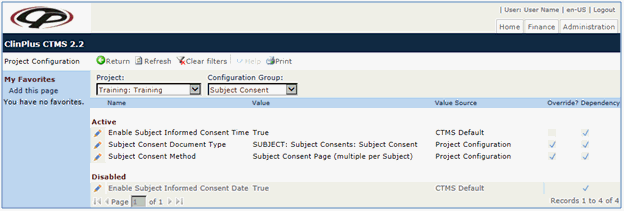
Click  next to Subject Consent Method.
Place a check in the Override box.
Select Subject Consent Page (multiple per Subject).
Click Save.
Click  next to Subject Consent Document Type.
Place a check in the Override box.
Select SUBJECT: Subject Consents: Subject Consent.
Click Save. The Project Configuration page should look like this:
If you did not click the check boxes that would allow the two Project document types to be added to all projects in an earlier step, then you will need to add them to the project.
 next to Project Document Types, and for the Base Table filter, select Project.
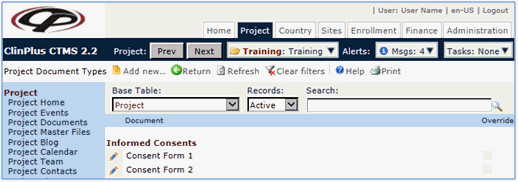
Change the Base Table filter to Site.
If Site Consents: Consent Form-Special is not listed, click the Add New button for the Project Document Type module to open.

For the Document Type field, select Site Consents: Consent Form-Special. Click Save and Save again for the document type to appear in the list.

Change the Base Table filter to Subject.
If Site Consents: Consent Form-Special is not listed, click the Add New button for the Project Document Type module to open.
For the Document Type field, select Site Consents: Consent Form-Special. Click Save and Save again for the document type to appear in the list.

Now, you can add the document to the project.
Under the Project tab, Project Documents menu item, click the Add New button for the New Document module to open.
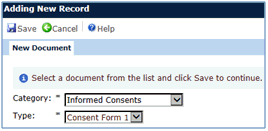
For Category, select Informed Consents and for Type, select Consent Form 1.
Click Save for the Document tab and other tabs to appear.
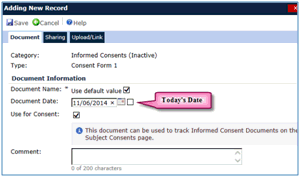
On the Document tab and Document Date field, you may enter Today’s date. You may determine this field’s meaning. For instance, this date can indicate when this form has been made available for this project or the date that this form was created.
Place a check in the Use for Consent box.
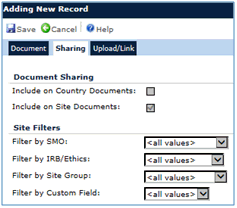
Click the Sharing tab and notice that the Include on Site Documents box is checked. This was brought forward from the Administration tab, Document Type system table for Consent Form 1.
Click the Upload/Link tab and notice that the Source field already has been populated with the selection the Administrator made on the Administration tab, Document Type system table for Consent Form 1.

In the Upload File field, click Browse and select a file. This file would be the template for the Informed Consent 1 document.
Click Save for the form to appear in the Project Documents list.

Click the Add New button to add Consent Form 2 as you did for Consent Form 1.

Add Document Types for Site
In this section, you will add the Special Document Type that was created in an earlier section for your site.
Under the Sites tab, Site Documents menu item, select your site. Notice that the two Project Consent Forms are listed.

To add the Special Site Document, click the Add New button for the New Document module to open and make the following selections:
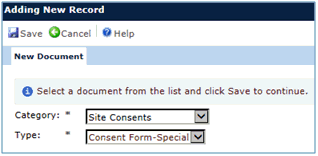
Click for the Document module to open and enter:
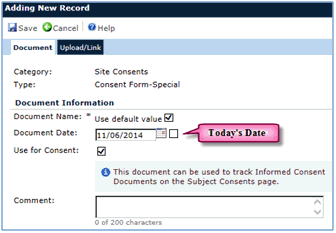
Click the Upload/Link tab and notice that the Source field already has been populated with the selection the Administrator made on the Administrator tab, Document Type system table for Consent Form-Special.

In the Upload File field, click Browse and select a file. This file would be the template for the Consent Form-Special document.
Click Save for the form to appear in the Site Documents list.

Adding Multiple Consents to a Subject Record
When the system is set to accept ONE consent, you simply enter the date in the Subject's Enrollment module. When the system is set to accept Multiple consents, a new menu item will appear on the Enrollment tab called Subject Consents.
On the Enrollment tab and Subject Consents menu item, select the Project, Site, and Subject.
Click the Add New button to open the Document module.
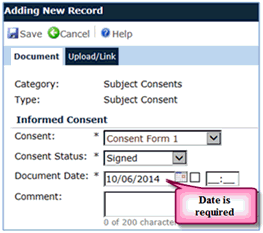
For the Consent field, select the appropriate document type, such as Consent Form 1 in this example.
For Consent Status, keep Signed.
For Document Date, enter the appropriate date.
Click the Upload/Link tab and notice that the Source field already has been populated with the selection the Administrator made on the Administration tab, Document Type system table for Subject Consent.

In the Upload File field, click Browse and select a file. This file would be the Subject’s completed consent form.
Click Save for the form to appear in the Subject Consents list.
To add the second consent, click the Add New button to open the Document module.
For the Consent field, select the second document, Consent Form 2.
For Consent Status, keep Signed.
For Document Date, enter the appropriate date.
Click the Upload/Link tab and browse to the subject’s second completed consent form.
Click Save for the form to appear in the Subject Consents list.
You can add the Site-Specific form, too, in the same way.
